Master Aerial Yoga Poses for Beginners Step by Step
Heather Rice
Feeling stiff or searching for an enjoyable way to strengthen your body without high-impact workouts? Aerial yoga combines traditional yoga postures with the support of a specialized hammock, making difficult moves like backbends and inversions easier and safer for beginners. For adults in Philadelphia, this unique fitness option offers gentle support while building flexibility and muscle. This guide lays out practical steps for setting up your space, selecting equipment, and mastering foundational poses, ensuring a confident start and steady progress.
Table of Contents
Quick Summary
| Key Point | Explanation |
|---|---|
| 1. Assess Your Space and Equipment | Ensure your practice area is spacious, secure, and has the proper overhead support to safely install your aerial hammock. |
| 2. Set Up the Hammock Properly | Use a sturdy mounting point and ensure all components are rated for sufficient weight to create a safe suspension system for your practice. |
| 3. Warm Up Before Practice | Engage in dynamic stretches and light cardio to prepare your muscles and joints, enhancing performance and reducing injury risk. |
| 4. Focus on Body Alignment | Maintain proper positioning throughout poses to prevent injuries; check shoulder, spine, core, and weight distribution frequently. |
| 5. Cool Down and Track Progress | Gradually decrease activity post-practice with gentle stretches and hydration, while documenting improvements to aid in your aerial yoga journey. |
Step 1: Prepare Your Space and Equipment
Setting up a safe and effective aerial yoga practice begins with creating the right environment and gathering essential equipment. Before you start your aerial yoga journey, you'll need to carefully prepare your space and choose the right gear to support your practice.
First, assess your available space and ensure you have a sturdy overhead mounting point capable of supporting your body weight. Most aerial yoga hammocks can support up to 300 kilograms of weight, but proper installation is crucial. You'll want an area with at least 8-10 feet of ceiling height and a clear radius of about 6 feet around your hammock to allow full movement without obstruction.
Equipment selection is critical for a safe aerial yoga experience. Here are the essential items you'll need:
Aerial silk hammock with sturdy support chains and carabiners
Secure ceiling mount or free-standing aerial rig
Thick exercise mat for floor work
Comfortable, form-fitting clothing without zippers or buttons
Optional: grip gloves for additional hand support
When selecting your hammock, look for professional-grade materials that can withstand repeated use and provide reliable support. The hammock should be hung less than one meter above the ground, which helps beginners feel secure while learning new poses.
Pro tip: Always test your equipment's weight capacity and mounting points before your first practice, and consider having an experienced professional help you set up your initial aerial yoga space.
Step 2: Set Up Your Yoga Hammock Safely
Setting up your aerial yoga hammock requires precision, care, and attention to safety details. Your goal is creating a secure suspension system that will support your body weight and allow fluid, confident movement during practice.
Selecting the right mounting point is crucial for a safe aerial yoga experience. Proper equipment setup involves identifying a structural support beam capable of handling significant weight. Ideal mounting points include:
Reinforced ceiling joists
Purpose-built aerial rigging frames
Professional-grade mounting brackets
Steel support beams
Before installation, you'll need specialized hardware to ensure a stable setup:
Check ceiling mount's weight rating
Select carabiners rated for your body weight
Use webbing straps designed for aerial equipment
Verify all connection points are secure
Important mounting guidelines include positioning your hammock approximately waist height, which allows safe entry and exit while providing enough clearance for basic poses. Most practitioners recommend leaving a 6-foot radius around your hammock to prevent accidental collisions with furniture or walls.
Safety always comes first in aerial yoga. Never compromise on equipment quality or installation integrity.
Pro tip: Consider having a professional rigger or experienced aerial yoga instructor verify your hammock installation before your first practice to ensure maximum safety and confidence.
Here's a summary comparing key safety and setup considerations for aerial yoga at home vs. in a studio:
| Factor | Home Practice | Studio Practice |
|---|---|---|
| Equipment Setup | Self-installed, requires personal verification | Professionally installed, regularly inspected |
| Space Requirements | Must create and clear your own area | Designed specifically for aerial yoga |
| Supervision | May require self-assessment or occasional instructor visits | Direct instructor guidance during every session |
| Safety Assurance | Relies on personal diligence and research | Guided by certified professionals |
| Maintenance | User responsibility, periodic checks needed | Studio staff manages upkeep and checks |
Step 3: Warm Up Your Body Effectively
Before diving into aerial yoga poses, preparing your body through a strategic warm-up is essential for preventing injuries and maximizing performance. Your warm-up will gradually increase muscle readiness and joint flexibility, setting the foundation for a safe and enjoyable aerial practice.
Dynamic stretching techniquesare crucial for preparing your body for aerial yoga movements. Start with light cardiovascular activities that gradually increase your heart rate and muscle temperature:
Gentle walking in place
Arm circles and shoulder rolls
Slow torso twists
Ankle and wrist rotations
Light marching movements
Progressive warm-up stages help your body adapt to the upcoming physical demands. Follow these key warm-up components:
Begin with 5-10 minutes of low-intensity movement
Perform dynamic stretches targeting major muscle groups
Focus on mobility exercises for shoulders, hips, and spine
Incorporate gentle joint mobilization techniques
Key muscle groups to focus on include your core, shoulders, and lower back, which are critical for aerial yoga stability and movement. Pay special attention to shoulder mobility and core engagement, as these will be fundamental in supporting your body during suspended poses.
Gradual, mindful warm-up is your first defense against potential aerial yoga injuries.
Pro tip: Listen to your body during warm-up and modify movements if you feel any unusual tension or discomfort, allowing yourself to ease into the practice gently.
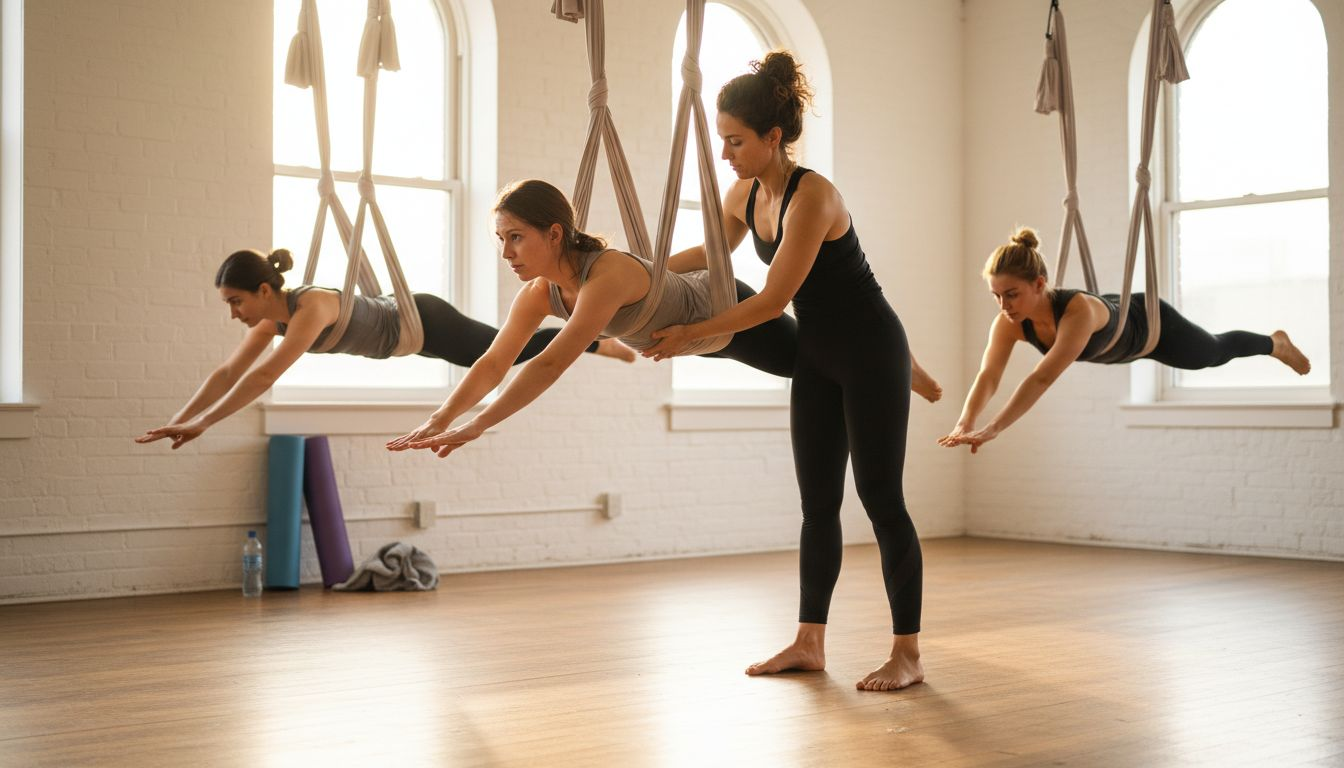
Step 4: Learn Foundational Aerial Yoga Poses
Mastering foundational aerial yoga poses will help you build confidence and develop essential skills for your aerial practice. By understanding and practicing these basic techniques, you'll create a solid foundation for more advanced movements.
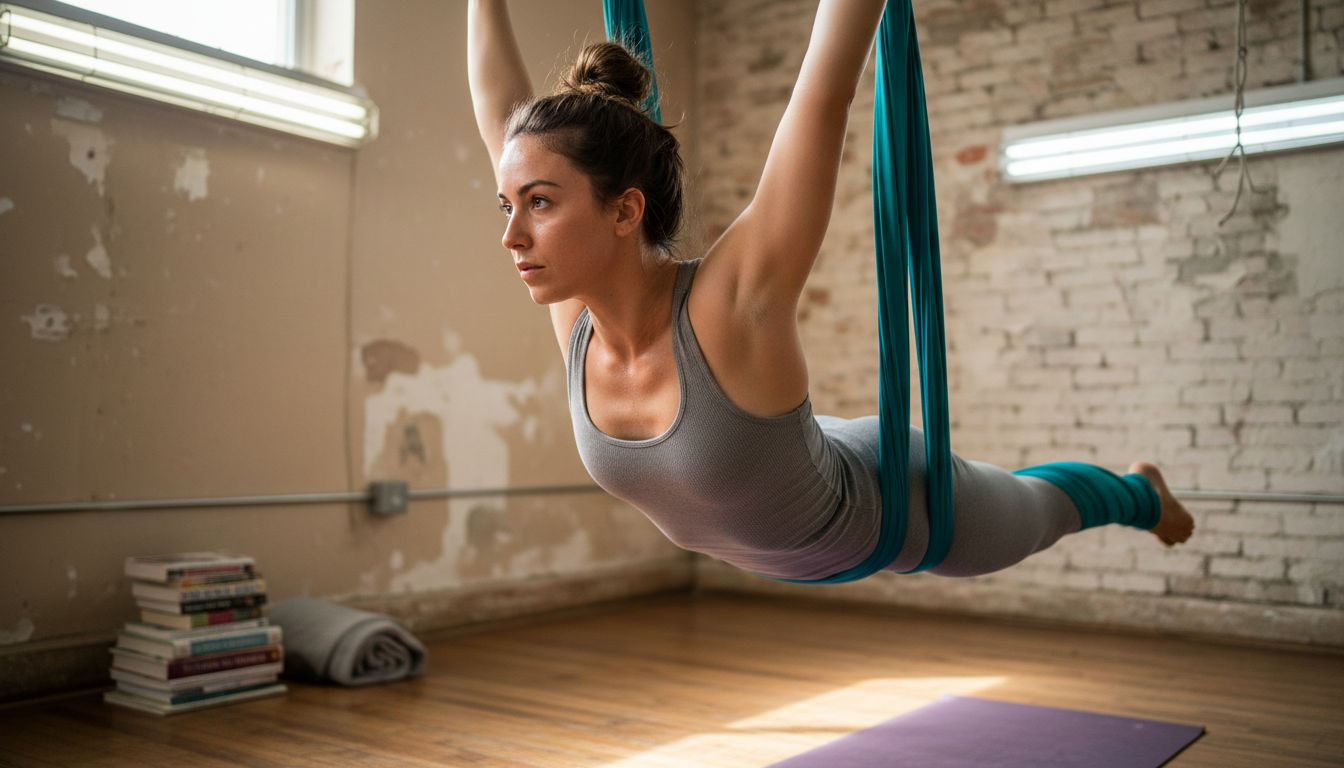
Beginner aerial yoga poses offer unique opportunities to explore movement with hammock support. These foundational poses help you understand how to use the hammock effectively while building strength and flexibility.
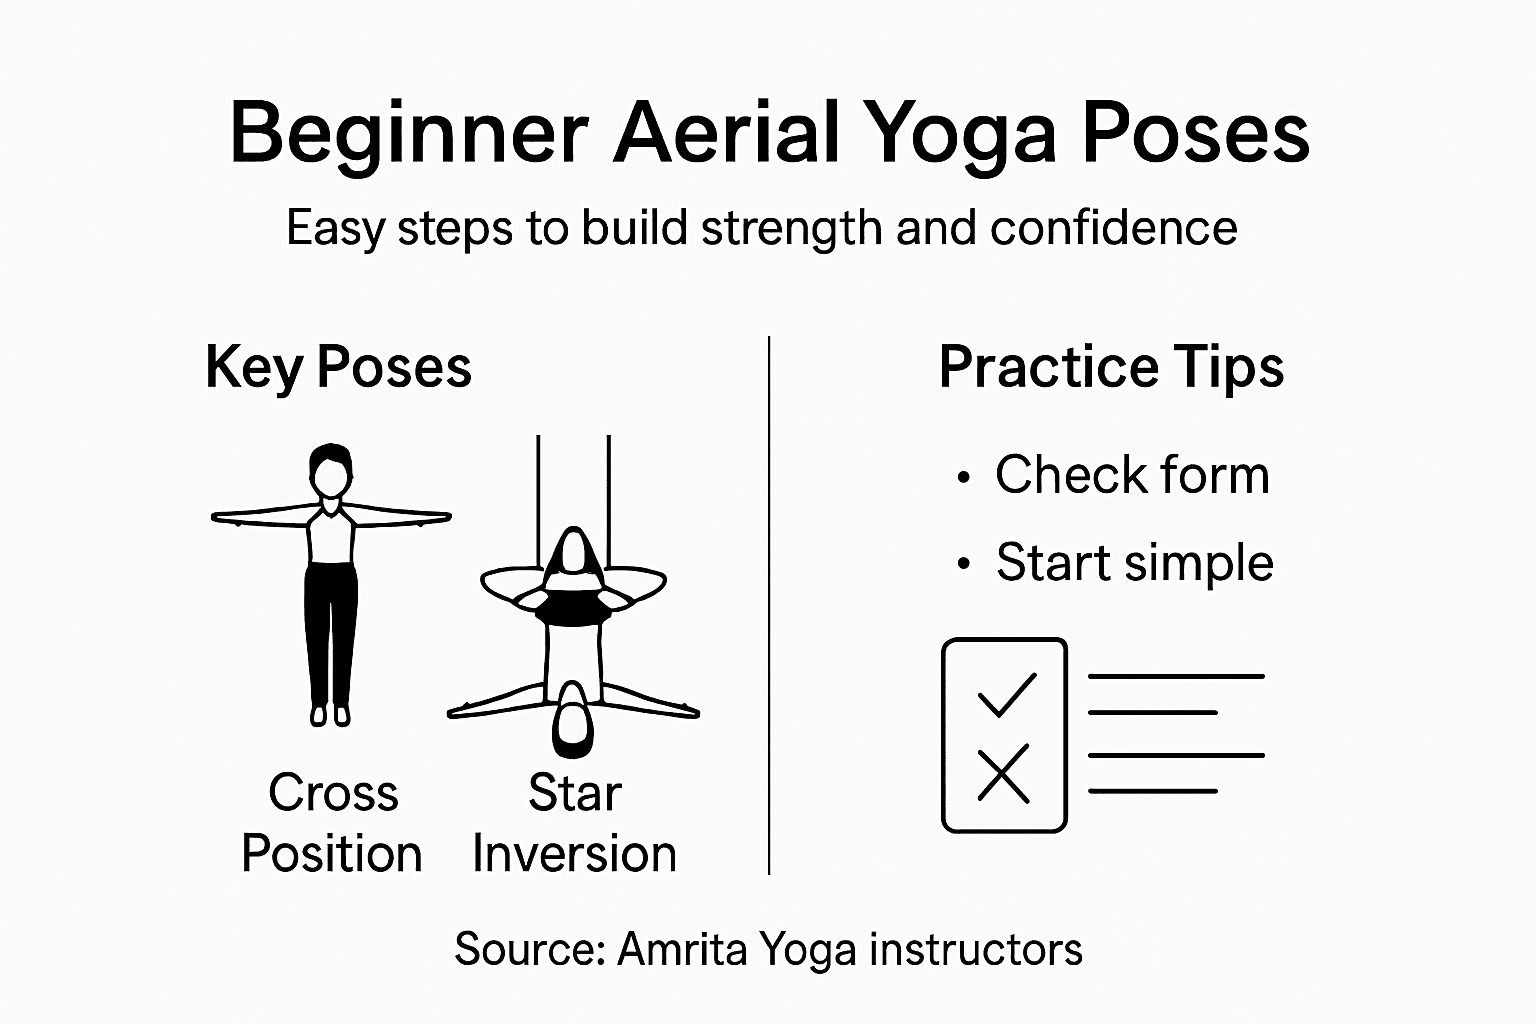
Here is a reference for common foundational aerial yoga poses and their benefits:
| Pose Name | Primary Focus | Typical Benefit |
|---|---|---|
| Cross Position | Core activation | Builds basic strength |
| Star Inversion | Spine and hips | Improves flexibility |
| One-Legged King Pigeon | Hips and quads | Enhances hip mobility |
| Seated Hammock Swing | Balance and posture | Develops coordination |
Cross Position: Basic suspended pose for beginners
Star Inversion: Gentle upside-down orientation
One-Legged King Pigeon: Modified hammock variation
Seated Hammock Swing: Basic seated suspension technique
Start with these progression steps for learning foundational aerial yoga poses:
Always begin with instructor guidance
Practice each pose slowly and mindfully
Focus on maintaining core engagement
Use the hammock for gentle support
Breathe steadily during each pose
Body alignment is crucial when practicing aerial yoga poses. Keep your movements controlled and pay attention to how the hammock supports your body weight. Core strength and balance will help you transition smoothly between different positions.
Your hammock is a tool for support, not just suspension. Learn to trust its stability and your own body's capabilities.
Pro tip: Start with extremely simple poses and progress gradually, allowing your body to adapt to the unique sensations of suspended movement.
Step 5: Check Your Form and Adjust Alignment
Perfecting your body alignment in aerial yoga is crucial for preventing injuries and maximizing the effectiveness of each pose. Understanding how to assess and adjust your positioning will help you develop a safer, more confident practice.
While aerial yoga provides unique support through the hammock, maintaining proper body mechanics remains essential. Key areas to focus on during form checks include:
Shoulder positioning: Keep shoulders relaxed and away from ears
Spine alignment: Maintain neutral spine position
Core engagement: Activate core muscles consistently
Weight distribution: Balance evenly across hammock support
Breathing pattern: Breathe deeply and steadily
Use these steps to systematically check and adjust your alignment:
Pause between pose transitions
Do a mental body scan
Make micro-adjustments as needed
Reset position if feeling unstable
Ask instructor for visual feedback
Body awareness plays a critical role in aerial yoga practice. Subtle movements and corrections can dramatically improve your overall performance and reduce strain on your muscles and joints.
Alignment is not about perfection, but about creating a balanced, sustainable practice that supports your body's natural movement.
Pro tip: Practice in front of a mirror or ask a fellow student to observe your form, providing an external perspective on your alignment and positioning.
Step 6: Cool Down and Monitor Progress
After an intense aerial yoga session, cooling down properly helps your body recover and prevents potential muscle soreness. Gradual exercise reduction is essential for maintaining your body's overall wellness and flexibility.
Your cool-down routine should focus on gradually lowering your heart rate and stretching the muscle groups you've engaged during your aerial yoga practice:
Gentle hammock stretches
Static floor stretches
Deep breathing exercises
Slow joint mobility movements
Hydration and relaxation
Implement these cool-down progression steps:
Exit hammock slowly and mindfully
Perform 10-15 minutes of gentle stretching
Focus on muscles used during aerial poses
Track your flexibility improvements
Drink water to support muscle recovery
Progress tracking is crucial for continuous improvement. Personal performance metrics will help you understand your aerial yoga journey, including flexibility gains, strength development, and mental focus.
Consistent practice and mindful reflection are the keys to steady advancement in aerial yoga.
Pro tip: Keep a workout journal to document your progress, noting specific pose improvements, flexibility changes, and how your body feels after each session.
Unlock Your Full Potential with Expert Guidance at Amrita Yoga & Wellness
Struggling to master foundational aerial yoga poses safely and effectively can feel overwhelming without proper support and instruction. This article highlights crucial steps such as setting up secure equipment, warming up mindfully, and fine-tuning your form to build strength and confidence. If you want to transform these challenges into opportunities for growth and well-being, Amrita Yoga & Wellness in Philadelphia offers the perfect environment to deepen your aerial yoga practice.
Join our welcoming community through expert-led classes and workshops that emphasize safe technique, body alignment, and tailored progression. Whether you are a beginner eager to learn the basics or seeking to integrate aerial yoga into your holistic wellness routine, we are here to guide you every step of the way. Take action now to elevate your body and mind by exploring all our offerings at Amrita Yoga & Wellness and start your journey toward aerial yoga mastery today.
Frequently Asked Questions
How do I prepare my space for practicing aerial yoga at home?
To prepare your space for aerial yoga, ensure you have a sturdy overhead mounting point and at least 8-10 feet of ceiling height. Clear a 6-foot radius around your hammock for safe movement, and choose a thick exercise mat to provide comfort during floor work.
What equipment do I need to start aerial yoga?
The essential equipment for aerial yoga includes a reliable aerial silk hammock, a secure ceiling mount or free-standing aerial rig, comfortable clothing, and optionally grip gloves for added support. Gather these items before starting your practice to ensure safety and effectiveness.
What are some foundational aerial yoga poses for beginners?
Foundational aerial yoga poses for beginners include the Cross Position, Star Inversion, One-Legged King Pigeon, and Seated Hammock Swing. Focus on mastering these poses to build strength and confidence in aerial techniques.
How can I check my form and alignment during aerial yoga?
To check your form in aerial yoga, perform a mental body scan during transitions and make micro-adjustments as needed. Pay attention to your shoulder positioning, spine alignment, core engagement, and weight distribution to maintain stability and prevent injuries.
What should my cool-down routine include after an aerial yoga session?
Your cool-down routine should consist of gentle hammock stretches, static floor stretches, and deep breathing exercises to lower your heart rate and relax your muscles. Aim for about 10-15 minutes of gentle stretching to promote recovery after each aerial yoga session.
How can I track my progress in aerial yoga?
Track your progress in aerial yoga by keeping a workout journal where you document improvements in flexibility, strength, and muscle recovery. Reflect on specific pose enhancements and how your body feels after each session to monitor advancements over time.