15 Minute Chair Yoga for Obese Beginners: 6 Week Strength Plan
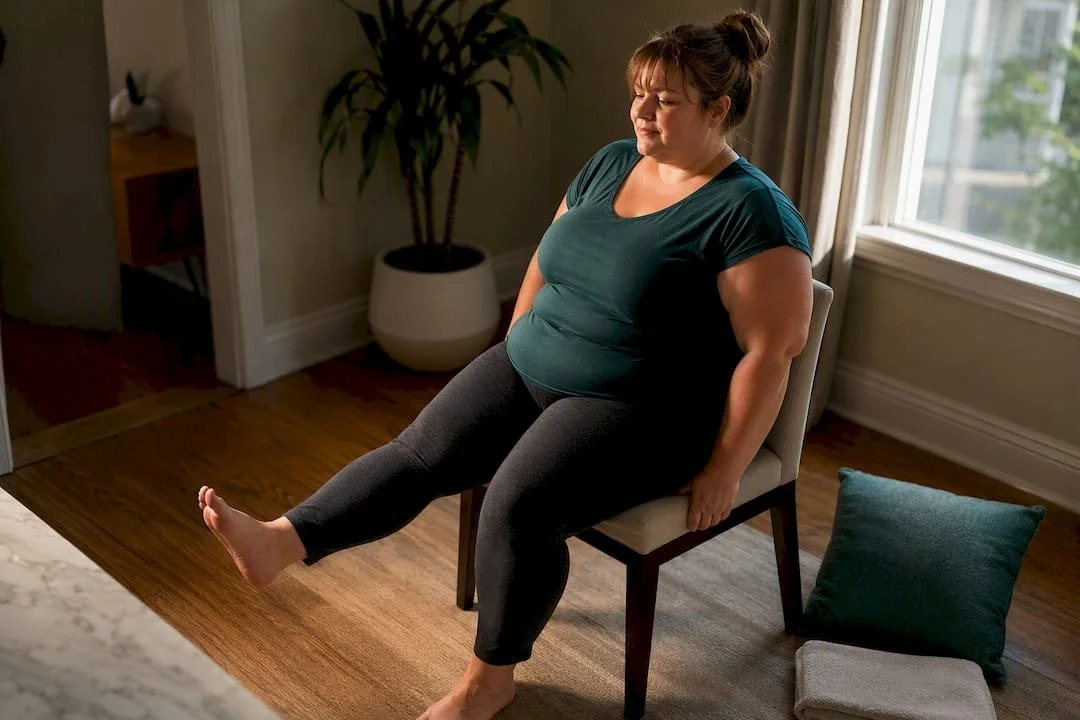
Chair yoga is a safe, low-impact way for obese beginners to start moving, provided you use a stable chair and a few simple modifications. Grab a sturdy armless chair, clear a few feet of floor space, and try the 10 to 15 minute sequence below today. If you have a major medical condition, recent surgery, or uncontrolled blood pressure, check with a clinician before you begin.
TL;DR:
Chair yoga improves flexibility, balance, and pain management, especially for limited mobility, with noticeable progress in sit-to-stand ability and joint comfort within weeks.
The recommended routine involves short sessions focusing on gentle movements, with modifications for comfort and safety, emphasizing consistency over intensity.
Progress tracking should prioritize functional markers like ease of standing and sleep quality rather than scale weight, which advances slowly.
Anyone with recent surgery, uncontrolled blood pressure, or severe osteoporosis should consult a healthcare professional before starting, and avoid sharp pain or dizziness during practice.
Combining regular practice with supportive studio classes or private instruction enhances safety, correctness, and motivation for long-term success.
Amritayogawellness
Find Your Supportive Wellness Practice
Explore accessible yoga and wellness classes in Philadelphia, with options for beginners and experienced practitioners seeking community and personal growth.
Table of Contents
What Chair Yoga Actually Does for Your Body and Mind
Chair yoga will not melt away pounds on its own, and you should walk in knowing that. What it does deliver is more useful in the first month than any number on a scale: looser joints, an easier time getting up from the couch, and a nervous system that stops running at full throttle by 3 p.m.
Controlled research on adapted seated exercise programs shows measurable gains in flexibility, balance, and pain scores among people with limited mobility, which is exactly the population chair yoga is built for. Several of the same seated exercise programs that produced those mobility gains also improved walking speed and functional capacity, meaning the benefits carry over into ordinary tasks like climbing stairs or carrying groceries.
The mental side matters just as much, maybe more, for a beginner trying to build a habit. Yoga interventions consistently show reduced stress markers and better sleep, and better sleep is one of the strongest predictors of whether someone sticks with an exercise routine at all. Poor sleep drives cravings and stress eating; fix the sleep, and the eating often follows.
Here's the part nobody wants to hear about calorie burn: it's modest. A person weighing 185 pounds burns roughly 133 calories in 30 minutes of light activity like gentle stretching or seated movement, according to Harvard Health's activity tables. That's not a number that erases a meal. What it does is stack with other changes, since more daily movement (what exercise scientists call non-exercise activity thermogenesis, or NEAT), lower stress hormones, and better sleep all nudge your body toward easier weight management over weeks and months rather than days.
Watch these markers instead of the scale during your first few weeks:
How easily you go from sitting to standing without pushing off with your hands
Whether your pants feel looser around the waist, even before the scale moves
How many times you wake up at night
Your energy level in the mid-afternoon slump
Whether stiffness in your knees or lower back eases when you get out of bed
Pro Tip: Take a waist measurement and a "sit to stand" count (how many times you can rise from the chair in 30 seconds) on day one. Retest in three weeks. Those two numbers move faster than body weight and they'll keep you motivated when the scale lies to you.
Is Chair Yoga Safe for Larger Bodies? Precautions to Know
Chair yoga is generally safe for obese beginners, but "generally safe" is not the same as "safe for everyone in every condition." A handful of red flags mean you stop and call a doctor before you do another session.
Talk to a clinician first if you have any of the following:
New or unexplained chest pain, shortness of breath at rest, or a recent cardiac event
Surgery within the last six weeks, especially abdominal, joint, or spinal procedures
Severe osteoporosis or a history of spinal compression fractures
Uncontrolled high blood pressure or uncontrolled diabetes
Significant joint replacement hardware that limits your range of motion
Once you're cleared to move, the next skill is telling the difference between productive discomfort and a warning sign. A little muscle fatigue, mild warmth in the working muscle, or a stretch sensation at the end of a range of motion are all normal. Sharp pain, a pinching feeling in a joint, dizziness, tingling down an arm or leg, or pain that lingers sharply for more than a day after class are not normal, and they mean you back off or skip that move next time.
Pacing matters more for beginners carrying extra weight than most fitness content admits. Your joints are managing more load per movement, so soreness the day after your first session is common and usually fades within 48 to 72 hours. Soreness that gets worse instead of better, or that shows up as swelling around a joint, is your body asking for a lighter version.
A few modifications solve most of the problems beginners run into:
Widen your foot stance on any seated pose that asks for balance. A wider base is a more stable base, full stop.
Shorten the range of motion. A quarter turn in a seated twist counts. Nobody is grading you on depth.
Use the chair back for support during side bends or twists instead of reaching for full extension.
Keep a wall within arm's reach, or have someone nearby, for any move that involves standing up from the chair.
Pro Tip: If a move asks you to lift both arms overhead and that spikes your heart rate uncomfortably fast, lift one arm at a time instead. Alternating sides cuts the cardiovascular demand of a pose without cutting the benefit.
Setting Up a Safe Chair Yoga Practice at Home
The right chair changes everything about how a session feels. Skip the wheeled office chair, the recliner, and anything with armrests that block your hips from moving freely. A plain, sturdy dining chair without arms, placed on a non-slip floor or a thin mat under the feet, is the gold standard. Your feet should rest flat on the floor with your knees roughly level with your hips. If they're not, stack a folded towel or a small cushion under your feet, or slide a firm cushion onto the seat to raise you up.
Clothing should let you move without pulling or riding up. Loose, breathable layers work better than compression gear for a first session, and closed-back shoes or bare feet grip the floor better than slides. Keep water within reach. Chair yoga sessions run shorter than a typical gym workout, but you can still work up a sweat, especially once you add the standing modifications from the routine below.
A few optional extras make the practice more comfortable without costing much:
A resistance band or loop, useful once you're ready to add light strength work to seated leg lifts
A wall positioned near the chair for balance support during standing transitions
An extra cushion or folded blanket for lumbar support if your lower back needs it during forward folds
A 15-Minute Chair Yoga Routine for Beginners
This sequence takes about 15 minutes and needs nothing but your chair, a little floor space, and comfortable clothes. Move slowly, breathe through your nose when you can, and treat every "easier" note below as a completely valid way to do the pose. There's no version of this that's the wrong one.
Seated marching (1 minute). Sit tall, feet flat, hands resting on your thighs. Lift one knee a few inches off the seat, lower it, then the other, building a steady rhythm. Gentle modification: lift your heel instead of your whole knee if hip flexion feels tight. Easier modification: tap your toes without lifting the leg at all, just to warm up the hip joint.
Shoulder rolls (1 minute). Roll both shoulders up, back, and down in slow circles, five times, then reverse direction. Add a big exhale on the downward part of the roll. Gentle: smaller circles. Easier: one shoulder at a time.
Seated cat cow (2 minutes). Hands on knees, inhale and arch your back, lifting your chest and looking slightly up. Exhale and round your spine, tucking your chin. Repeat six to eight times, moving with the breath. Gentle: keep the arch and round small, just enough to feel your spine shift. Easier: focus only on the exhale round, skipping the arch if your lower back is sensitive.
Seated side bend (1 minute). Anchor your right hand on the seat or your thigh, reach your left arm overhead, and lean gently to the right. Hold for two breaths, then switch sides. Gentle: keep the reaching arm bent instead of straight overhead. Easier: skip the arm reach entirely and just lean your torso to the side.
Seated twist (1 minute). Sit tall, place your right hand on the outside of your left knee, and gently twist your torso to the left, looking over your shoulder. Hold two breaths, then switch. Gentle: twist only from the ribs up, keeping hips square. Easier: place both hands on your thighs and just turn your head and shoulders slightly.
Seated leg lifts (2 minutes). Extend one leg straight out, hold for a breath, then lower it without letting your foot slam down. Do six to eight lifts per leg. Gentle: keep a slight bend in the knee instead of straightening fully. Easier: lift the leg just an inch or two off the floor rather than extending it out.
Seated knee extensions with a squeeze (1 minute). Same setup as the leg lift, but pause at the top and squeeze your thigh muscle for a full breath before lowering. This builds strength faster than a fast, bouncy lift.
Assisted sit to stand or mini squat (2 minutes). Scoot to the front edge of the chair, feet hip-width apart. Lean forward slightly, push through your heels, and stand up, using your hands on your thighs or the chair arms if needed. Sit back down with control. Repeat five to eight times. Gentle: do a "mini squat" instead, hovering an inch above the seat before sitting back down fully. Easier: stand up and sit down using both hands fully braced on the chair or a nearby wall for support.
Seated marching with arm swings (1 minute). Combine the marching from step one with opposite arm swings, right knee up as left arm swings forward. This builds coordination without any impact. Gentle: slow the pace way down. Easier: march only, no arms.
Heel and toe lifts (1 minute). Feet flat, lift both heels off the floor, hold, then lower and lift both sets of toes instead. This wakes up circulation in the lower legs, which matters if you sit for long stretches during the day.
Seated forward fold (1 minute). Feet wide, hinge forward from your hips over your thighs, letting your arms hang or rest on your shins. Breathe here for three to five breaths. Gentle: only fold halfway, resting hands on knees. Easier: skip the fold and instead round forward just a few inches while seated tall.
Chest opener and breath (1 minute). Clasp your hands behind the chair back or interlace fingers behind you, gently lifting your chest. Hold for three breaths, then release into a short body scan, noticing how your shoulders, jaw, and hands feel before you stand up.
Pro Tip: Do this sequence at the same time every day for the first week, right after coffee or right before dinner. The specific time matters less than the repetition. Habits form around cues, not motivation.
Your 6-Week Plan to Build Strength and Confidence
Progress in chair yoga is not linear, and it shouldn't be. The plan below adds time and intensity gradually, based on research showing that short, frequent sessions build better adherence and functional gains than occasional marathon workouts.
Weeks 1 and 2: build the habit. Do the 15 minute routine once a day, focusing entirely on form rather than speed or repetition count. Your only job here is showing up. Skip a day if you're sore, but come back the next one.
Weeks 3 and 4: add volume. Extend sessions to 20 to 25 minutes by adding a second round of the strength moves (leg lifts, knee extensions, sit to stand) or holding poses like the side bend and twist for an extra breath. If the mini squat felt easy in week 2, try the full sit to stand more often, using less hand support each time.
Weeks 5 and 6: build flow and consider standing options. Link poses together with fewer pauses between them, shorten your rest between rounds, and consider adding a short second micro-session later in the day, five minutes of marching and breathing while you're on a phone call, for example. If your balance feels solid and a clinician has cleared you, add light standing poses near the chair for support, like a standing forward fold with hands on the seat.
Track progress with something other than the scale:
Sit-to-stand repetitions in 30 seconds, retested every two weeks
How many rounds of leg lifts you complete before your form breaks down
Whether you need the chair back for balance during twists, or can hold position without it
Sleep quality and how many times you wake during the night
If you plateau, or a specific move consistently causes joint pain rather than muscle fatigue, that's the signal to work with an instructor for one-on-one adjustments rather than pushing through alone.
Breathing Techniques to Pair With Your Practice
Breath is not decoration in chair yoga. It's the mechanism that keeps a session gentle instead of accidentally strenuous. The basic rule: inhale as you lengthen or open (reaching an arm up, arching in cat cow), exhale as you fold, twist, or engage a muscle (rounding your spine, lifting into a sit to stand).
Box breathing is a simple pattern worth learning: inhale for four counts, hold for four, exhale for four, hold for four. Repeat for one minute during the cool-down. Skip the "hold" portions and just breathe in and out slowly if you have a respiratory condition like COPD or asthma, since breath holding can feel uncomfortable for some people with lung conditions.
Diaphragmatic breathing means breathing so your belly rises more than your chest. Rest one hand on your stomach during the seated forward fold and feel it push into your hand on the inhale. This activates the parasympathetic nervous system, the "rest and digest" side, which is part of why gentle movement combined with slow breath measurably lowers stress hormones in controlled studies.
Close every session with a 60 second body scan: eyes closed or soft gaze, attention moving from your feet up to your scalp, just noticing without judging. For more structured practice, Amrita Yoga & Wellness has a library of mindfulness activities for stress relief that pair well with a movement cool-down.
Pro Tip: If you catch yourself holding your breath during a pose (a common habit under physical effort), that's usually a sign the pose is slightly too intense. Ease back until the breath flows naturally again.
Why Studio Support Makes a Real Difference
A home routine gets you moving, but a trained eye catches things you can't see in yourself, like a hip that's rotating during a "seated" twist or a knee tracking wrong during a sit to stand. A Philadelphia studio built around accessible practice offers beginner-level classes designed for exactly this stage of a fitness path.
Private sessions matter most for anyone managing joint pain, a past injury, or a health condition that needs individualized pacing, since a private instructor can rebuild the entire sequence around your specific limits rather than asking you to modify a group class on the fly. Group formats matter too, for a different reason: showing up alongside other beginners removes the isolation that often kills a new habit before it takes hold.
Whether you're working through the routine above at home or ready for guided instruction, the goal is the same one this whole guide has pushed toward: consistent, safe movement that respects the body you're in today.
Small Wins Add Up Faster Than You Think
The biggest mistake I see beginners make isn't skipping a workout. It's dismissing a real win because it doesn't look like the "before and after" photos everyone else posts. Standing up from a chair without using your hands, for the first time in years, is a genuine physical achievement. Sleeping through the night after a session is a genuine physical achievement. Neither shows up on a scale, and both matter more for long-term health than a number ever will.
Tie your practice to something you already do every day, coffee, brushing your teeth, a lunch break, so you're not relying on willpower to remember. On the days you can't do the full 15 minutes, do three minutes of seated marching and breath work instead of nothing. A short session that happens beats a perfect session that doesn't. Compare yourself only to the person who started this practice, not to anyone else's pace.
— Juiced
Ready for Guided Support? Here's How Amrita Yoga & Wellness Can Help
A home routine gets you started, but a room full of people moving at your pace, with an instructor who actually corrects your form in real time, gets you further, faster. A local studio runs beginner-friendly classes built for exactly the stage you're at now, plus private sessions for anyone who needs modifications tailored to a specific joint issue, a recent surgery, or a health condition that a group class format can't fully accommodate.
Your first class at a studio like this usually starts with a short conversation about what you can and can't do comfortably, so the instructor can adjust poses before you ever hit the mat. Private sessions go a step further, building a sequence around your body instead of asking you to adapt someone else's. And if part of your wellness routine includes a little reflection and stress relief beyond the physical, the studio's tarot reading sessions are worth checking out as a complementary way to slow down and check in with yourself. Book a beginner class or a private session to see how a guided, supportive setting changes what your practice can do.
Sources
The safety and mobility claims in this guide draw on controlled research into adapted, seated exercise programs, including studies on physical function in older adults and functional gains from seated programs. Stress and sleep claims come from yoga research on stress reduction and sleep quality. Calorie estimates are based on Harvard Health's activity tables, and the progression plan's emphasis on short, frequent sessions is grounded in adherence research on short, frequent exercise programs.
This article is general information, not a substitute for advice from a qualified doctor. Consult a qualified healthcare professional about your own circumstances before acting on anything here.
Functional improvements following seated exercise programs (PMC3193654)
Calories burned in 30 minutes for people of three different weights — Harvard Health
Adherence benefits of short, frequent group exercise programs (PLOS One)